Welcome to the ultimate Frostfire Mine guide. In this event, your main objective is to collect as much orichalcum as possible. There are two key methods to do this: mining orichalcum veins found in zones level 1 through 3, and controlling the smelter for passive gains. While many players focus only on one strategy, this Frostfire Mine guide takes a more strategic approach. We’ll show you how to efficiently combine resource gathering with tactical point maximization to gain a competitive edge over other players.
Whether you’re a beginner or looking to optimize your gameplay, this guide will walk you through advanced tips and tricks to dominate the Frostfire Mine event.
🗺️Focus on the Outskirts – Frostfire Mine Guide Tip

One of the smartest strategies in this Frostfire Mine guide is to avoid diving into the heavily contested central zones. Instead, position yourself around the outer edges of the battlefield (highlighted in red on the map). These outskirt areas tend to attract fewer players, giving you more freedom to farm orichalcum and eliminate patrol guards without constant interference.
By staying on the edge, you’ll face less competition, allowing for more consistent point gains and better control over your surroundings – a key tactic for long-term success in the Frostfire Mine event.
🛡️Prioritize Patrol Guards – Key Frostfire Mine Guide Strategy
A crucial part of this Frostfire Mine guide is prioritizing your energy and troops to defeat patrol guards early in the match. Instead of wasting time collecting orichalcum veins right away, focus on defeating these guards to earn HP, which is essential for unlocking powerful skills.
Avoid mining in the early game. Concentrate on eliminating patrol units until you’ve unlocked your third skill. This will give you a major advantage moving forward and set the stage for more efficient orichalcum farming later on.
🧠Skill Selection – What to Unlock and When
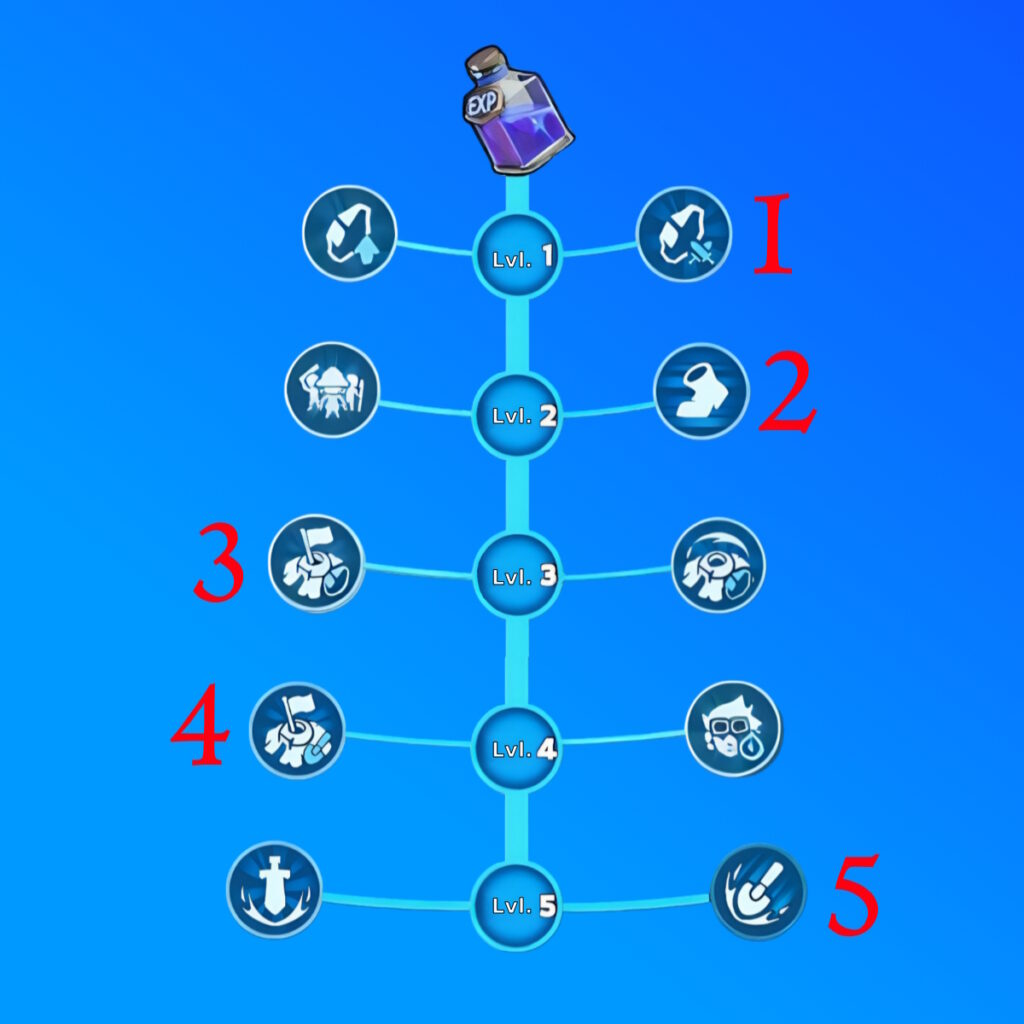
As highlighted in the Frostfire Mine event, each defeated patrol guard grants you HP. Keep an eye on the circular progress bar in the bottom-left corner of your screen. Once it’s full, you’ll be able to unlock a skill.
However, unlocking skills isn’t just about speed, it’s about making the right choice. Selecting an inefficient ability too early can hurt your longterm performance and reduce your chances of placing high in the rankings. Be patient and strategic when investing your HP.

💪Skill no 1. Unlock the First Skill – (Right Path)
Start by unlocking the first skill on the right branch of the tree. It’s essential for building momentum early, as it rewards you with 1,500 orichalcum every time you defeat a patrol guard.
The sooner you activate this bonus, the faster your income grows so make this your first priority as you begin clearing the battlefield.
💪Skill no 2. March Speed Boost – Unlock the Right Skill Early
After earning your first skill point, consider unlocking the second skill on the right side of the tree. This ability increases your troops’ marching speed by 25%, which is especially useful for reaching veins faster or contesting key positions ahead of other players.
Maintaining high mobility is crucial during the early and mid stages of the Frostfire Mine event, so this skill can give you a real edge, just make sure you keep defeating patrol guards to earn enough HP for the unlock.
💪Skill no 3. Orichalcum Bonus – Unlock Left Path Skill
Once you’ve unlocked the second skill, continue defeating patrol guards to earn enough HP for the third one – this time on the left branch of the tree. It rewards you with an extra 5,000 orichalcum every time you occupy a vein.
The bonus activates once per minute, so make sure you’re consistently farming and claiming new veins to get full value from it. It’s one of the best early skills for boosting your orichalcum gain over time in the Frostfire Mine event.
⏱️How to Track the 3rd Skill Cooldown
Since the third skill doesn’t have a visual cooldown indicator, you’ll need to rely on the event timer at the top of the screen. It’s your best tool for tracking when a full minute has passed since the last activation.
Keeping an eye on the timer helps ensure you don’t miss out on its orichalcum bonus. Time your vein captures wisely to get the most out of this passive ability.
🎯How to Use the 3rd Skill Effectively
To get the most value out of this skill, send one march to occupy a vein roughly every 60 seconds, then immediately recall it. This action will grant you 5,000 orichalcum per use, making it a reliable way to steadily boost your income throughout the match.
While you continue clearing patrol guards for HP, be sure to dedicate one march specifically for triggering this skill. Whether it’s a standard vein or a vein outburst, timing it every minute can significantly increase your total yield.
💪Skill no 4. Left Path – Gathering Speed Boost
Once the previous skills are unlocked, invest in the fourth skill on the left side of the tree. It provides a +15% gathering speed bonus – a solid upgrade that helps you extract more orichalcum in less time.
While you keep eliminating patrol guards for more HP, don’t forget to trigger your third skill consistently every minute. Combining both effects – passive orichalcum gain and faster gathering that gives you strong momentum as the event progresses.
💪Skill no 5. Right-Side Skill – Smelter-Free Strategy
This part is crucial. In this guide, we intentionally avoid recommending smelter occupation bc it’s risky and often contested. Instead, go for the fifth skill on the right side of the tree, which boosts your gathering speed by a massive 66%.
With this skill unlocked, your vein farming becomes significantly faster and more efficient – a major advantage when you’re relying solely on gathering to climb the rankings in Frostfire Mine.
🎯How to Use the 5th Skill Effectively
The 5th skill has a cooldown of 5 minutes and can only be activated during vein outbursts. When it’s ready, a red dot will appear in the bottom-left corner of your screen. Make sure to activate the skill first, then immediately send your troops to occupy as many outburst veins as possible.
Keep all marches on those veins for the full 5 minutes – don’t recall them early. Once the cooldown is over, repeat the process during the next vein burst for maximum benefit. Timing and troop commitment are key to getting the full value from this powerful gathering boost.
🧳Important Tips – Final Reminders for Frostfire Mine
- Make use of the free advanced teleport inside the battlefield. Move between areas if patrol guards or veins become scarce, repositioning saves time and maximizes output.
- Keep a close eye on veins occupied by nearby players. If they recall early, be ready to loot those veins before others do.
- During vein outbursts, stop attacking patrol guards. Instead, send all available marches to veins to capitalize on the bonus gathering speed.
- Use all of your marches primarily to eliminate patrol guards. That it’s your main source of HP and points. However, always reserve one march to regularly gather and recall from a vein every 60 seconds. This is essential for triggering key skills like the third and fifth.
- Stick to this strategy until the very end of the event. Only break the pattern when vein outbursts appear, then switch fully to vein control.
- Kill patrol guards until the final seconds of the event – don’t slow down early. Consistency in eliminating guards is what keeps your HP and score flowing.
🎯 Dodatkowe uwagi według poziomu gracza
🍼 F2P / Small Players
Parameters:
Power: <15M
Marches: 3-4
Primary Goal:
Safe gathering, no PvP
Tips:
- 🪨 Stick to Level 1 mines (gray zones)
- 🏃 Teleport to the outer edges of the battlefield
- 🧠 Use all your marches, spread them out
- ⚠️ Avoid combat entirely
- 🎯 Go for Vein Outbursts only if they’re uncontested
- 🛠️ Upgrade Frostfire skills like gather speed and mine attack
😎 Mid-Level Players
Parameters:
Power: 15M-40M
Marches: 4-6
Primary Goal:
Focus on L2 gathering + light PvP + Outbursts
Tips:
- 🪨 Prioritize Level 2 mines (yellow zones)
- ⚔️ Kick weaker players off valuable tiles
- 💥 Aim to secure Vein Outbursts (between 8-10 & 18-20 min)
- 📦 Keep all marches active at all times
- 🛠️ Upgrade the same core skills: gather speed, mine attack, and more
🐋 Whales / PvP Masters
Parameters:
Power: 40M+
Marches: 6
Primary Goal:
Full dominance: L3 control, PvP, Outbursts, and Smelter
Tips:
- 🪨 Take control of Level 3 mines (red zones) and Outbursts
- 🏰 Occupy the Smelter around the 23-minute mark
- 🔁 Keep all marches rotating constantly – no downtime
- 🛠️ Max out critical skills: gather speed, Armory boosts, and combat enhancements
💡 General Tips for All Players
- ✅ Join right on time – even a few seconds early helps
- ✅ Teleport early to the best gathering zones
- ✅ Don’t hold back troops – you lose nothing in this event
- ✅ Vein Outbursts offer a massive point boost – don’t miss them
- ✅ If any march is idle, something’s wrong – fix your rotation immediately

Solid breakdown finally someone gets it
been top 1 in frostfire multiple times and this is one of the few guides that actually shows how high level players play
skill timing outburst rotations march discipline, all spot on
respect for keeping it clean and straight to the point
hope more people read this so matchmaking isn’t a total nightmare 😅🔥