Bear Trap, also called Bear Hunt, rewards good rally setups, useful support heroes and active marches. Aim to increase your damage across the whole event.
Personal damage determines your session reward tier. The former Alliance Damage Rewards were merged into Personal Damage Rewards. Bear Hunt also has Personal Best Total Damage Rewards: check your next unclaimed personal-best milestone as well as the session tier. Cooperation still matters because a well-run rally helps its participants perform better.
Quick start: your next Bear Hunt
- Leading: use a developed three-hero lineup with useful offensive Expedition skills and relevant gear. Coordinate starts so rallies fill and troops keep moving.
- Joining: put a suitable support hero first, such as Jessie, Jasser or Seo-yoon. Check the selected skills in the flag panel and send your strongest available troops within the alliance’s troop cap.
- Everyone: prepare presets you can sustain across active marches, check arrival times and avoid idle queues. Track your total event score, not just your biggest hit.
1. Understand your role before choosing heroes
Evaluate the rally leader’s combat stats and full three-hero Expedition lineup alongside the selected support skills. A joining march contributes troops and can supply the first Expedition skill of its first, flagged hero. The rally uses up to four selected joiner skills. Exploration skills do not apply here.
The other two heroes in a joining march do not add Expedition support skills, but can help you deploy more troops. Skill level determines the strength of a selected skill; hero development and deployment capacity are separate considerations. Check the troop count your formation can actually send.
As a joiner, your troop count, types and tiers still matter. Keep personal points bonuses, such as Cyrille’s, separate from shared rally effects when comparing scores. Hero skills and the numerical stat bonuses in a report are also separate parts of combat.
For a broader explanation, see our Raid Heroes and Their Buffs guide.
2. Build a rally leader lineup for your account
Choose a developed three-hero formation by looking at its full Expedition kit, relevant offensive stats and equipment. The highest Power number or newest generation label is not enough to establish the best Bear lineup.
Ask three questions:
- Which skills improve damage, Attack or Lethality, and which troop types benefit?
- Are those skills developed enough to compete with the heroes you already use?
- Does an exclusive-gear effect apply to attacking rallies, or does its wording require defending?
Separate an exclusive weapon’s basic Expedition stats from its conditional skill. A defender-only skill will not help an attacking rally, but the weapon can still supply relevant Lethality when that hero leads.
A hero with a defensive first skill can still be worth testing as a leader. Hector, for example, has a defensive first Expedition skill but offensive effects elsewhere in his kit. That makes his leader evaluation different from his evaluation as a first-slot joiner. Likewise, an early account should not leave a leader slot empty simply because its available Infantry hero is defensive.
Equip your leading heroes with your strongest relevant gear. Compare reports before spending scarce resources to replace a developed hero.
3. Choose joiners by their first skill, not their rarity
Jessie, Jasser and Seo-yoon are practical early support options. Jeronimo can also provide useful support when he is available and is not needed for your own rally. Their level-5 first Expedition skills are different:
- Jessie, Stand of Arms: increases all-troop damage dealt by 25%.
- Jasser, Tactical Genius: increases all-troop damage dealt by 25%.
- Jeronimo, Battle Manifesto: increases all-troop damage dealt by 25%.
- Seo-yoon, Rallying Beat: increases Troops Attack by 25%.
Later support options include Bradley’s Veteran’s Might, which provides 25% all-troop Attack at level 5, and Blanchette’s Armed to the Teeth, which provides 25% all-troop Lethality. Compare them by their first skill and its level, just as you would earlier heroes.
Read these two skill descriptions closely:
- Reina’s Assassin’s Instinct reaches 30% extra normal-attack damage. This does not increase every source of damage by 30%.
- Gwen’s Eagle Vision increases the target’s damage taken by up to 25%. Compare her with your available support options using the controlled test below; her listed percentage alone does not establish that she is better or worse than Bradley or Blanchette.
Attack, Lethality, damage dealt, normal-attack damage and damage taken are different effects. Identical percentages do not establish identical results. A passive offensive bonus can be useful; being passive is not the reason to reject a skill.
T11 or T12 alone does not establish a universal support-hero switch. Repeat your comparison after unlocking new troop tiers or effects.
Check which four skills were selected
Higher-level eligible skills take priority. At equal skill levels, earlier joining marches retain priority. This means a useful level-4 support can be displaced by an unsuitable level-5 one.
Inspect the selected support skills in the rally’s flag panel. Matching skills can stack, so you do not need four different hero names. A listed 25% effect does not guarantee 25% more final damage than your previous setup.
If you have no suitable first-slot hero free, a troops-only march avoids introducing an unsuitable support skill. Check its lower deployment capacity before saving it. A low-skill filler is an advanced alternative when four higher-level approved supports are already selected. For a quiet trap that regularly leaves with fewer than four useful supports, leaders can agree a separate fallback list of weaker offensive skills to fill those empty slots. Check the selected list in either case.
Follow the rally leader’s instructions. Fix a wrong preset before the next march rather than turning the event into an argument.
4. Choose a troop mix you can sustain
Infantry deal damage despite their usual frontline role. Marksmen are strong single-target attackers, making a Marksman-heavy march a useful starting point. Balance your troops around the leader’s lineup, your troop tiers and the number of active marches.
Treat 10/30/60 and 10/10/80 as test formations in Infantry/Lancer/Marksman order. Neither is universally optimal: available troops, the leader’s stats and troop-specific skills affect the choice.
An all-troop hero skill does not automatically need a token unit of the hero’s class to activate. A skill that specifically benefits Lancers, however, needs Lancers to produce that particular benefit. Do not confuse a hero’s class with the wording of its skill.
Budget troops across your active marches
Before the event, count how many useful marches you can keep working at the same time. Then allocate your available troops across them.
For example, four simultaneous marches of 100,000 troops with 80% Marksmen would require 320,000 Marksmen. If you own 300,000, saving four identical 80% presets does not create the missing 20,000. A later deployment will need adjustment or will go out underfilled.
Prioritize your stronger troop tiers and the rallies where they perform well, while avoiding unnecessary idle queues. If your alliance sets a joiner troop cap to share rally capacity, build your presets around that cap.
The best mix for one hit may not produce the best event total. Record both damage per comparable attack and the number of attacks you actually complete.
5. Plan rallies around real travel times
Bear Hunt has a 30-minute event window. Place regular rally leaders close enough to the trap to reduce travel time, and give joiners a clear plan for which rallies to fill. Our Bear Trap map planner can help organize positions; check your actual in-game march times before committing to a schedule.
Staggering rally starts can keep troops moving, but a fixed instruction such as five leaders every minute will not suit every alliance. Adjust the number of leaders and the spacing to attendance, rally capacities, distance and how quickly returning troops can join again.
For example, 20 online players with 15 rallies already open need to check how those rallies fill before adding more. If rallies repeatedly depart half-empty, reduce simultaneous starts or adjust the troop cap; if troops sit idle waiting for openings, add or redistribute starts.
Practical rules:
- Have an initial set of rally leaders ready when the event opens.
- Check your march ETA against the rally’s departure timer before joining.
- Avoid opening more rallies than the available players can fill usefully.
- Do not leave a march idle for several minutes just because one preferred rally is full.
- Leave a small timing margin for the last round. New rallies cannot be initiated once fewer than five minutes remain.
Trap schedule and personal eligibility are separate
Personal eligibility follows UTC calendar days: if you participate on Monday, you become eligible again from Wednesday at 00:00 UTC. This is not a fixed 46-hour or 48-hour wait. Check the in-game eligibility timer, especially after changing alliances or switching trap times.
The alliance’s trap timer and scheduled opening are separate. If your alliance has two traps, publish each opening time and check which one you are joining. Check Auto-Register settings too.
Choose a time that suits your members’ time zones. Evening for one player may be the middle of the working day for another.
6. Prepare the trap, bonuses and presets
Start with preparation that does not require spending:
- Check the enhancement level of the trap being used and contribute Explosive Arrowheads where needed. Extra donations do not raise a trap beyond its maximum enhancement level.
- Recall troops and heroes from tasks that would prevent you using the intended formations.
- Save separate leader and joiner presets. Select the correct first-slot joiner before setting the troop numbers.
- Recheck every preset after changes to heroes, troop availability or deployment capacity.
- Check the troop count shown immediately before deploying. A saved formation is a shortcut, not a guarantee that its troops and heroes are currently available.
For a leader, review relevant Attack, Lethality and rally bonuses, including equipped gear and available pet effects. For a joiner, focus first on the approved support hero, strong troops and usable deployment capacity. Do not spend consumable combat buffs merely because they increase the Power shown on a deployment screen.
Before spending consumables, check both your session reward tier and your next unclaimed Personal Best Total Damage milestone. Reaching the highest session tier does not rule out a personal-best reward. Further attacks can also help teammates.
Temporary boosts are optional. Check their effect, duration and relevance to your role before using them. Defense and Health are not offensive bonuses.
Check Cyrille if Experts are unlocked
Cyrille’s Hunter’s Heart is passive: it does not require pressing an activation button before each hunt. It increases your Bear Hunt damage points according to its current level, including when you join another player’s rally. Record that level when comparing scores across sessions; a points bonus can change the final result without proving that a new troop ratio was responsible.
Also review the Bear-specific capacity and reward effects shown in your Cyrille panel. Rally capacity, personal deployment capacity, damage points and extra reward items solve different problems. Choose upgrades for the role you actually play.
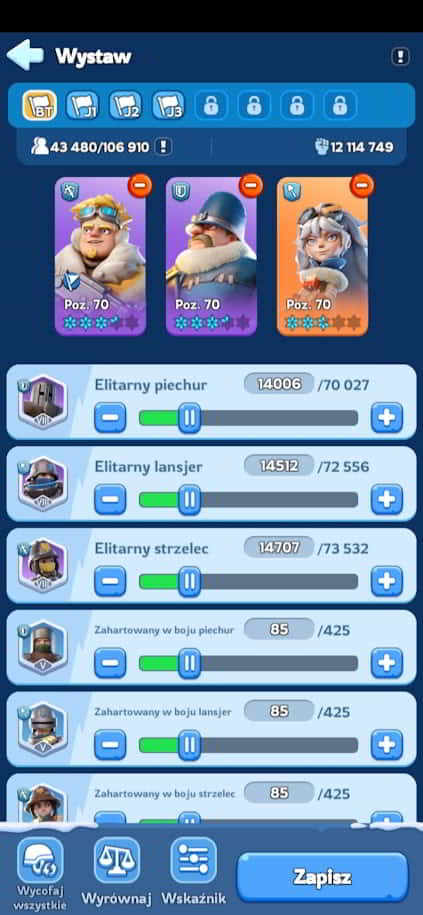
These older screenshots illustrate saved formations; replace the displayed hero levels and near-even troop mix with your own heroes, available troops and alliance troop cap.


7. Find out what actually improves your damage
Change one thing at a time. For a support comparison, replace exactly one selected support skill and keep the other three, including their levels, unchanged. Match the leader’s lineup and combat stats, the full rally composition and your own march. For a troop-ratio test, keep the supports, total troop count and troop tiers fixed, changing only the intended troop mix.
For a useful comparison, record:
- The rally leader, their three heroes, skill levels, equipment and displayed combat stats.
- The four selected support skills and their levels, checked in the bonus panel for every hit.
- The full rally’s troop counts, types and tiers, plus the same details for your own march.
- Trap enhancement, temporary bonuses and Cyrille’s points-bonus level.
- Your individual damage or points from the same report field each time.
- Completed attacks and total event score.
Where practical, alternate setups A and B within the same event and save each report. Chance-based skills make single hits unreliable: compare several results and their typical value and spread. If other conditions changed, treat the comparison as inconclusive.
If your score suddenly drops
Check for an underfilled march, a different leader, an unsuitable selected support, an expired bonus, fewer completed attacks or troops that were still returning before changing your whole lineup.
Final checklist
Before the event: confirm the trap time and eligibility, prepare the trap, free your troops and check presets.
During the event: use the approved first-slot heroes, inspect support selection, check arrival times and keep useful marches active.
After the event: review comparable reports and choose one improvement to test next time.
Reliable support, sensible troop allocation and fewer missed attacks make a repeatable plan for better Bear Hunt scores.


“The game randomly selects 4 from all available Expedition skills (if more players join)”
Actually, not randomly, but by a certain, rather simple algorithm.
Yes, I know it’s not truly random. Based on my current understanding, the game actually uses a simple selection algorithm: it takes into account the highest skill levels among all players who joined and selects them from the top down.
For example:
If the joining players have skill levels 5, 5, 5, 4, 5, the game will pick 4 players in order, skipping the one with skill level 4.
But if the levels are 4, 5, 5, 5, 3, 4, the game will take the three players with level 5 and then include the first player in the joining order (the one with level 4).
I need update the guide 😛
That’s right! ☺️ I had no doubt that you knew this ☺️, I just pointed out this small inaccuracy so that it would be clear to beginners that the choice of hero’s skills for “Rally Bonus” is not randomly.
I would also like to take this opportunity to ask in which states do you have your characters? I consider myself a beginner “wos nerd” and I’m so tired of playing in the state, surrounded by not the smartest people ☺️, I would like to try to play with pro-level players, but in an alliance where they don’t require spending money.
The ratio examples don’t align with the advice. Which needs to be changed?
Thanks for pointing that out! You’re absolutely right! The examples were incorrect and didn’t match the recommended ratios. We’ve already updated the section, so thanks again for helping us improve the guide! <3